Posts

Image
If you had gone through my blog entry here, i would have talked about using UDML as a way for automating migration from dev to test/prod environments. But the major problem with UDML is that one cannot update the passwords of Connection Pools, Users etc since the UDML expects them to be encoded. In such a case, for updating passwords alone we can use an undocumented command line switch option for the AdminTool. For example, look at the screenshot below. If you had gone through my blog entry here, i would have talked about using UDML as a way for automating migration from dev to test/prod environments. But the major problem with UDML is that one cannot update the passwords of Connection Pools, Users etc since the UDML expects them to be encoded. In such a case, for updating passwords alone we can use an undocumented command line switch option for the AdminTool. For example, look at the screenshot below. Open Dev_Machine.rpd Administrator Administrator SetProperty "Connecti...

Using a Dashboard Prompt as a Column Selector for Multiple Reports

Image
Dashboard prompts are typically used for filtering data values in reports, but you can also use Dashboard prompts to switch out columns on multiple reports, similar to the way a column selector would work on an individual report, but on a broader scope. Here is an example along with the high level steps: 1.Identify the names of the columns to include in the Dashboard Prompt Column Selector, in this example: Region and Market 2.Create a logical column that will produce these values: CASE WHEN Paint.Periods."Year" < '2001' THEN 'Region' ELSE 'Market' END Create a new Dashboard Prompt that contains this column and populates a Presentation Variable based on this column: Create your reports that will be affected by this Dashboard Prompt. For the specific report column that will be switched out, use the Presentation Variable in the column formula to dynamically change the column data based on the Dashboard Prompt: 1.It’s a good ide...

Automated RPD updates using UDML (Unix or Windows Env)

http://oraclebizint.wordpress.com/2008/04/04/oracle-bi-ee-101332-udml-to-automate-repository-updates-migration-of-repositories-from-development-to-testproduction-environment/

Some Useful Excel Macros

Replace Line in a text file Sub OpenEditSaveCloseTextFile()     Dim fso As Object     Dim fil As Object     Dim txt As Object     Dim str_path As String     Dim str_change As String     str_path = "e:\test"     Set fso = CreateObject("Scripting.FileSystemObject")     MsgBox ("Starting Replacement")     For Each fil In fso.GetFolder(str_path).Files         'If fil.Type = "Text Document" Then             Set txt = fil.OpenAsTextStream(1)             str_change = txt.ReadAll             txt.Close             str_change = Replace(str_change, "FIND_WHAT", "REPLACE_WITH", , , vbTextCompare)             With fil.OpenAsTextStream(2)                 .Write str_...

ROOT ARC S [4.1.B.0.587] eRoot v1.3.4

There is method for ROOT your Xperia ARC S in few steps with eRoot 1. First download and extract  DooMLoRD ADB drivers 2. From DIR /Files execute file ADB.exe and wait to install  Without this drivers your SE xperia ARC S was not been recognized... 3. Connect your Xperia ARC S with USB cable  In your Xperia ARC S must be checked installation from UNKNOWN SOURCES and USB DEBUGGING, also phone must be in state MSC MODE SETTINGS>XPERIA>CONNECTIVITY>USB CONNECTION MODE>MSC MODE SETTINGS>SECURITY>UNKNOWN SOURCES SETTINGS>DEVELOPER OPTIONS>USB DEBUGGING Dont allow PC Companion to be installed on your PC at this step, however install PC companion in the beginning to install ADB drivers for your mobile if you not done already. 4. Download and start  eRoot v1.3.4 5. Press -root and wait to process be compete. For confirmation of succeeded ROOT-ing Super User app has been installed

How To Unlock Bootloaders on your Xperia Arc S

UPDATE : Before you proceed, please visit  this link  to check if your phone’s boot loader can be unlocked or not? NOTE:  If the light above the USB port on your phone doesn’t turn blue when you connect your phone using the USB cable to your PC while holding the “MENU” button (on Xperia Arc. For Xperia Play – “SEARCH” button), then it means that you cannot connect to fastboot, and hence you cannot unlock the boot loader. Here’s a Step by Step guide (w/ video) on how to unlock bootloaders on your Xperia Arc, Play, Neo & Pro. [info]Although this guide is made using Xperia arc, I can assure that it would work perfectly with Xperia Play, Neo & Pro too. NOTE : Xperia Play users should press the “ Search ” button instead of “ Menu ” button in Step 8th of this tutorial.[/info] [warning]The methods and procedures discussed here are considered risky and you should not attempt if you don’t know completely what it is. If any damage occurs to you or your device, w...

Inherited Colour Vision Deficiency

Image
Red/green colour blindness is a common hereditary condition which means it is usually passed down from your parents. Colour blindness is usually passed from mother to son on the 23rd chromosome, which is the sex chromosome. Chromosomes are structures which contain genes – these contain the instructions for the development of cells, tissues and organs. If you are colour blind it means the instructions for the development of your cone cells are wrong and the cone cells might be missing, or less sensitive to light or it may be that the pathway from your cone cells to your brain has not developed correctly. The X chromosome is the sex chromosome: males have an X chromosome and a Y chromosome and females have two X chromosomes. For a male to be colour blind the faulty colour blindness gene only has to appear on his X chromosome. For a female to be colour blind it must be present on both of her X chromosomes. This is why red/green colour blindness is far more common in men than women. Bl...

Automated RPD updates using UDML (Unix or Windows Env)

http://oraclebizint.wordpress.com/2008/04/04/oracle-bi-ee-101332-udml-to-automate-repository-updates-migration-of-repositories-from-development-to-testproduction-environment/

Changing RPD Connection Pool Passwords automatically for migration (Windows Env)

Image
If you had gone through my blog entry here, i would have talked about using UDML as a way for automating migration from dev to test/prod environments. But the major problem with UDML is that one cannot update the passwords of Connection Pools, Users etc since the UDML expects them to be encoded. In such a case, for updating passwords alone we can use an undocumented command line switch option for the AdminTool. For example, look at the screenshot below. This is nothing but the connection Pool property of the ORCL database. Here, we would like to change the schema names and its corresponding passwords. For example, we would like to change the schema to SH and also would like to change the password. In order to do that, open a text editor and enter the below command. Save the file in the same directory as the Admin Tool ({OracleBI}\Server\Bin). If not, then you would have to give the full path of the file. Open Dev_Machine.rpd Administrator Administrator SetProperty "Connectio...

Multiple RPD & Presentation Services on Single Server

Image
Courtesy: D£bashis' Blog The objective of the thread is to understand the process of configuring multiple RPD and Presentation service in same BI server instance .Once that will be understood it can be further extended in scalable solution to integrate the approach on multiple server based instance as per business demands .The OBIEE suite documentation mentioned this functionality could be achieved but never mentioned the detail steps how to achieve this . The initial bit could be found at below URL of Mark Rittman though not in detail : http://www.rittmanmead.com/2007/09/11/managing-multiple-presentation-services-on-the-same-unix-box/ My goal in this thread is to clearly define the entire process however multiple Presentation Services instances on a machine is “NOT SUPPORTED BY ORACLE” . The effective use of this approach will support multiple RPD editing online and also modifying multiple BI catalog online through two different instance .Also this would facilitate the ...

Adding hints without Repository (RPD) change

Image
Adding hints without Repository (RPD) change Adding hints at the table level or join level is most common however requires a RPD change. This involves server restarts and downtimes. Sometimes it may be necessary to use different hints in some specific answers based reports. And that needs a way to apply hints in OBIEE Answers level, here is how… NB: These hints are always overridden by the repository hints, so in order to make these to work there shouldn’t be any hints in the repository atleast for the same tables. 1. Go to BI answers and start a new request 2. To add a report specific hint in the request, the first column in the request should have a function with the hint as shown here As shown in the above diagram the evaluate function is used to create the hint in the database sql but with the table alias, to know the table alias – use the Query repository utility in the BI Admin tool   So in this case the alias will be T69092. It is very...

Between Prompts for Date Columns

Image
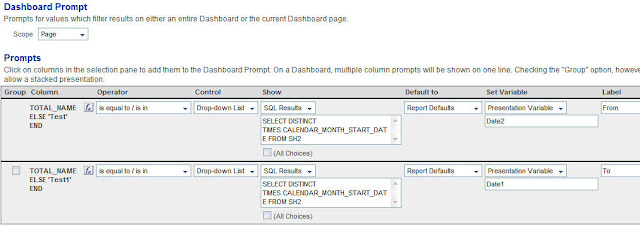
Say you need a report containing Start Date, Sales and Number of Days where Number of Days is the number of days between the values chosen in the dashboard prompt, to achieve this using Presentation Variables. This is a variation of the approach that we saw earlier here. Lets start with creating a dashboard prompt. This dashboard prompt shall contain 2 prompts on any column. For both the columns, in the formula tab enter the below formulas CASE WHEN 1=0 THEN CHANNELS.TOTAL_NAME ELSE ‘Test’ END CASE WHEN 1=0 THEN CHANNELS.TOTAL_NAME ELSE ‘Test1′ END We have used the above formula in order to protect the columns from getting the filters. This is very important for setting presentation variables and at the same time not affecting any columns Now, for both the prompts convert the Results to SQL Results and enter the below SQL SELECT DISTINCT TIMES.CALENDAR_MONTH_START_DATE FROM SH2 In the above case, TIMES.CALENDAR.MONTH_START_DATE is my date column. Make both th...

OBE for Oracle BI EE (Link for Life)

Oracle BI Online Tutorials : http://apex.oracle.com/pls/apex/f?p=9830:bi:4045727751880523 Expaling things like; Component : BI Admin Tool # Creating a Repository Using the Oracle Business Intelligence Administration Tool # Setting Up Multiuser Development Environment (MUDE) Using Oracle BI Administration Tool # Cloning and Synchronizing Oracle BI Requests and Dashboards Using Content Accelerator Framework # Setting Up Usage Tracking in Oracle BI EE # Creating and Modeling Aggregate Tables # Merging/Importing Objects from Different Repositories using Oracle BI Administration Tool # Using Oracle OLAP 11g With Oracle BI Enterprise Edition # Integrating Oracle Essbase with Oracle Business Intelligence Suite Enterprise Edition # Federating Essbase and Relational Data Sources in Oracle Business Intelligence Suite EE+ Component : BI Answers # Creating Interactive Dashboards and Using Oracle Business Intelligence Answers Component : BI Delivers # Sending Alerts Using Oracle ...

Using Initialization Blocks with LDAP and database queries to control authentication and authorization

Image
Courtesy: Borkur Steingrimsson To set up an existing LDAP server to validate the credentials of the use who is logging on to the OBIEE we first open the Administrator tool and in the Manager->Security… tool we define a new LDAP server: The values you enter here are, of course, dependent on your system and your LDAP administrator can give you the correct values you need. But once you have defined an LDAP server we pop over to the Manager->Variables… tool and start the real work. First off we define an Initialization Block called something like LDAP Init Block. An Init Block needs a data source, so we define one by clicking on the ‘Edit Data Source…’ button and choose data source type: LDAP. Click on the ‘Browse…’ button and select the LDAP server we defined before. You can actually create new LDAP servers here as well, by clicking the ‘New…’ button (which just starts the same wizard we used previously). Next we need to map LDAP attributes to Session Variables. Click ...